Remote Desktop is an extremely useful feature that allows users to access their Windows 11 computer from anywhere. It especially benefits IT professionals, work-from-home users, and business owners. In this article, we will explain in detail the complete process of enabling remote desktops in Windows 11.
What is Remote Desktop and why is it useful?
Remote Desktop is a feature provided by Microsoft that allows users to control their PC remotely. It is useful for the following reasons:
Facility to access a computer from another location
System troubleshooting for the IT support team
Use of office systems even while away from the workplace
Facilities for file transfer and remote working
Now let us understand in detail how to enable Remote Desktop in Windows 11.
Ways to enable Remote Desktop in Windows 11
There are several ways to enable Remote Desktop in Windows 11. We will tell you the complete process to enable it from Settings, Control Panel, Command Prompt, and Windows PowerShell.
1. Enable Remote Desktop through Settings
Follow the steps given below to enable Remote Desktop from Settings in Windows 11:
1. Open Settings by pressing the Windows + I keyboard shortcut.
2. Go to the System section.
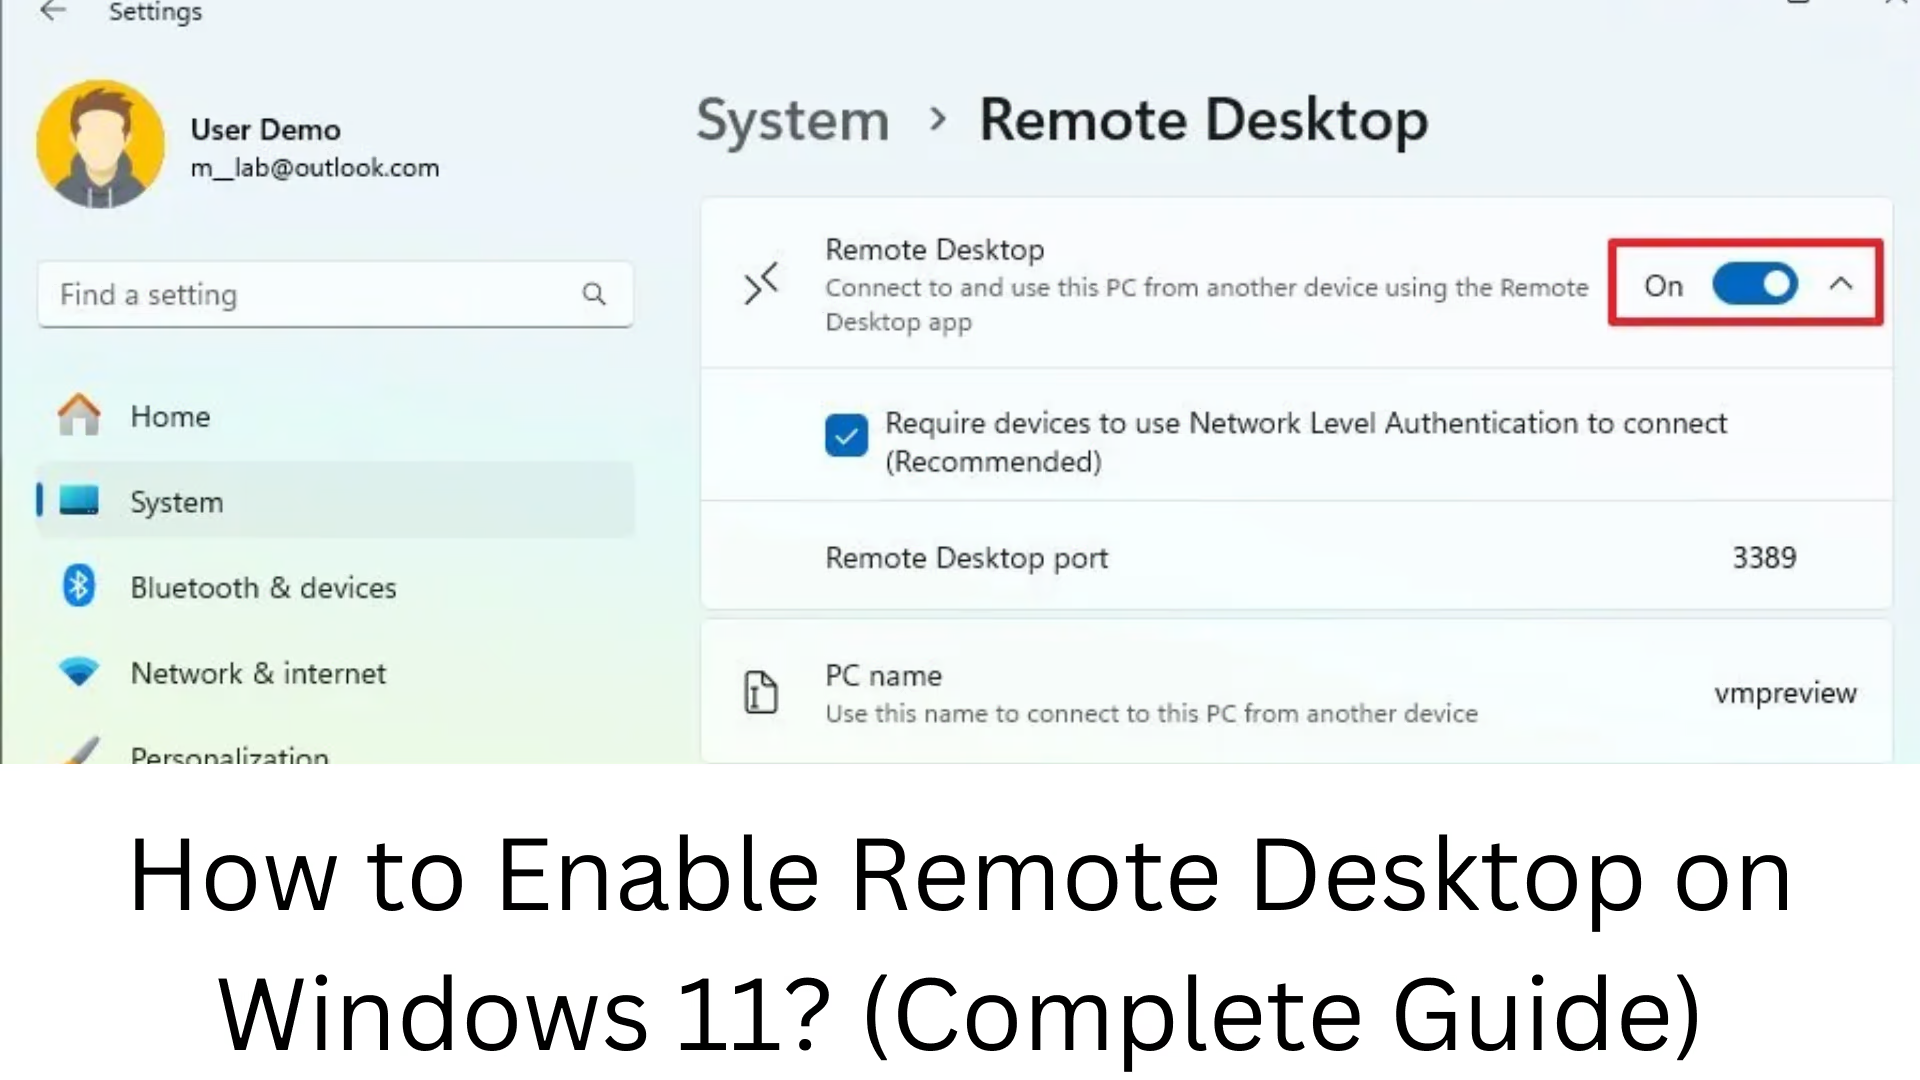
3. Scroll down and click on the Remote Desktop option.
4. Turn on the toggle button to enable Remote Desktop.
5. Click Confirm.
6. If necessary, also turn on “Keep my PC awake for connections when it is plugged in” to connect to the Remote Desktop.
7. Add users to the Remote Desktop User List so that only authorized users can use this feature.
2. Enable Remote Desktop from Control Panel
If you want to enable Remote Desktop from Control Panel, follow the below steps:
1. Press Windows + R type sysdm.cpl and press Enter.
2. The System Properties window will open, here click on the Remote tab.
3. Select the “Allow remote connections to this computer” option.
4. Click on Apply and OK.
3. Enable Remote Desktop from Command Prompt (CMD)
If you want to enable Remote Desktop using the command line interface, follow the below steps:
1. Press Windows + S and search for Command Prompt.
2. Click on Run as administrator. 3. Type the following command and press Enter:
reg add “HKEY_LOCAL_MACHINE\SYSTEM\CurrentControlSet\Control\Terminal Server” /v fDenyTSConnections /t REG_DWORD /d 0 /f
4. Also run this command to fully enable Remote Desktop:
netsh advfirewall firewall set rule group=”Remote Desktop” new enable=Yes
5. Close the Command Prompt and restart the system.
4. Enable Remote Desktop from Windows PowerShell
To enable Remote Desktop using PowerShell, follow these steps:
1. Press Windows + X and select Windows Terminal (Admin).
2. Type the following command and press Enter:
Set-ItemProperty -Path ‘HKLM:\System\CurrentControlSet\Control\Terminal Server’ -name “fDenyTSConnections” -Value 0
Enable-NetFirewallRule -DisplayGroup “Remote Desktop”
3. Restart the system.
Configure Network Settings for Remote Desktop Access
After enabling Remote Desktop, you also need to set up your network settings correctly:
1. Check Firewall Settings: Make sure Remote Desktop Connections are allowed.
2. Note the IP Address: Note the IPv4 Address by running the “ipconfig” command.
3. Port Forwarding: If you are connected to a router, forward the 3389 port to your system.
How to connect to Remote Desktop (for Windows and Android/iOS)
How to connect to Remote Desktop on Windows 11 from Windows?
1. Press Windows + R and type mstsc.
2. The Remote Desktop Connection window will open.
3. Enter the Computer Name or IP Address.
4. Click on the Connect button.
5. Enter Username and Password and login.
Access Remote Desktop on Windows 11 from Android and iOS
1. Download the Microsoft Remote Desktop app (from the Google Play Store or Apple App Store).
2. Enter the IP Address of the Remote PC.
3. Enter Login Credentials and connect.
How to fix Remote Desktop related issues?
If you are having problems with the Remote Desktop connection, try the following measures:
Allow Remote Desktop in Firewall Settings.
Restart the PC and try to connect again.
Check the IP Address correctly.
Check Windows Update and install all the latest updates.
Conclusion
Enabling Remote Desktop in Windows 11 is quite easy. This feature is extremely important for remote working, system management, and IT support. With all the methods mentioned in this article, you can enable Remote Desktop in your Windows 11 system and use it easily.
Frequently Asked Questions (FAQ) about Remote Desktop in Windows 11
1. Is Remote Desktop available in all editions of Windows 11?
No, the Remote Desktop feature is only available in Windows 11 Pro, Enterprise, and Education editions. It is not available by default in Windows 11 Home Edition.
2. How can I check if my Windows 11 supports Remote Desktop?
You can check by following these steps:
1. Go to Settings > System > About.
2. Check the Windows Edition.
3. If it is Windows 11 Pro, Enterprise, or Education, a Remote Desktop will be available.
3. Can Windows 11 Home users use Remote Desktop?
Windows 11 Home users don’t get the Remote Desktop Server feature, but they can connect to another PC using the Remote Desktop Client. It can be enabled using a third-party tool like RDP Wrapper on Windows 11 Home.
4. Is there any security risk after enabling Remote Desktop?
Yes, there is a risk of Unauthorized Access if security measures are not followed. To prevent this:
Use Remote Desktop only on trusted networks.
Use Strong Passwords and Two-Factor Authentication (2FA).
Use Firewall and VPN.
5. Can I access Remote Desktop on Windows 11 from mobile (Android or iOS)?
Yes, you can connect to your Windows 11 PC using the Microsoft Remote Desktop App (available on Google Play Store and Apple App Store).
6. Is the internet required to use a Remote Desktop?
If you are in a local network (LAN), then internet will not be required. But if you want to connect from a remote location, then the internet will be required.
7. What is the port number of Remote Desktop in Windows 11?
The default port of Remote Desktop is 3389. You can also change it by going to Registry Editor or Windows Firewall.
8. How can I ensure my Remote Desktop connection is secure?
For a secure connection:
Use a VPN.
Enable Remote Desktop Network Level Authentication (NLA).
Allow only selected IP addresses in the firewall.
Keep Windows updated.
9. What to do if the Remote Desktop is not working?
If the Remote Desktop is not connecting, follow these steps:
Check the firewall settings and make sure Remote Desktop is allowed.
Restart the PC and try again.
Verify that the IP address is correct by running the “ipconfig” command in Command Prompt.
Check Windows Update and network settings.
10. Can I give Remote Desktop Access to multiple users at the same time in Windows 11?
By default, only one user can have Remote Desktop Access at a time in Windows 11. If you want to allow Multiple Users, you can use a third-party tool like RDP Wrapper.