In today’s digital age, the DNS (Domain Name System) is an extremely important part of internet browsing. If you want to increase internet speed on your iPhone, improve security, or use a particular DNS server (such as Google DNS, Cloudflare, or OpenDNS), then this guide is for you. Here, we will explain how to add a Custom DNS Server on iPhone, step by step.
What is a DNS server, and why should it be changed?
The DNS server is the system that converts the domain name you enter (such as google.com) into an IP address. When you use a fast, secure, or content-filtering DNS server, you get a better browsing experience.
Two Main Ways to Add Custom DNS Server on iPhone
You can set DNS in two main network modes on an iPhone:
1. Setting Custom DNS for Wi-Fi Network
2. Setting DNS for the Whole System on iPhone (By DNS Apps)
How to Add a Custom DNS Server on a Wi-Fi Network
This method will only work on the Wi-Fi network you are connected to.
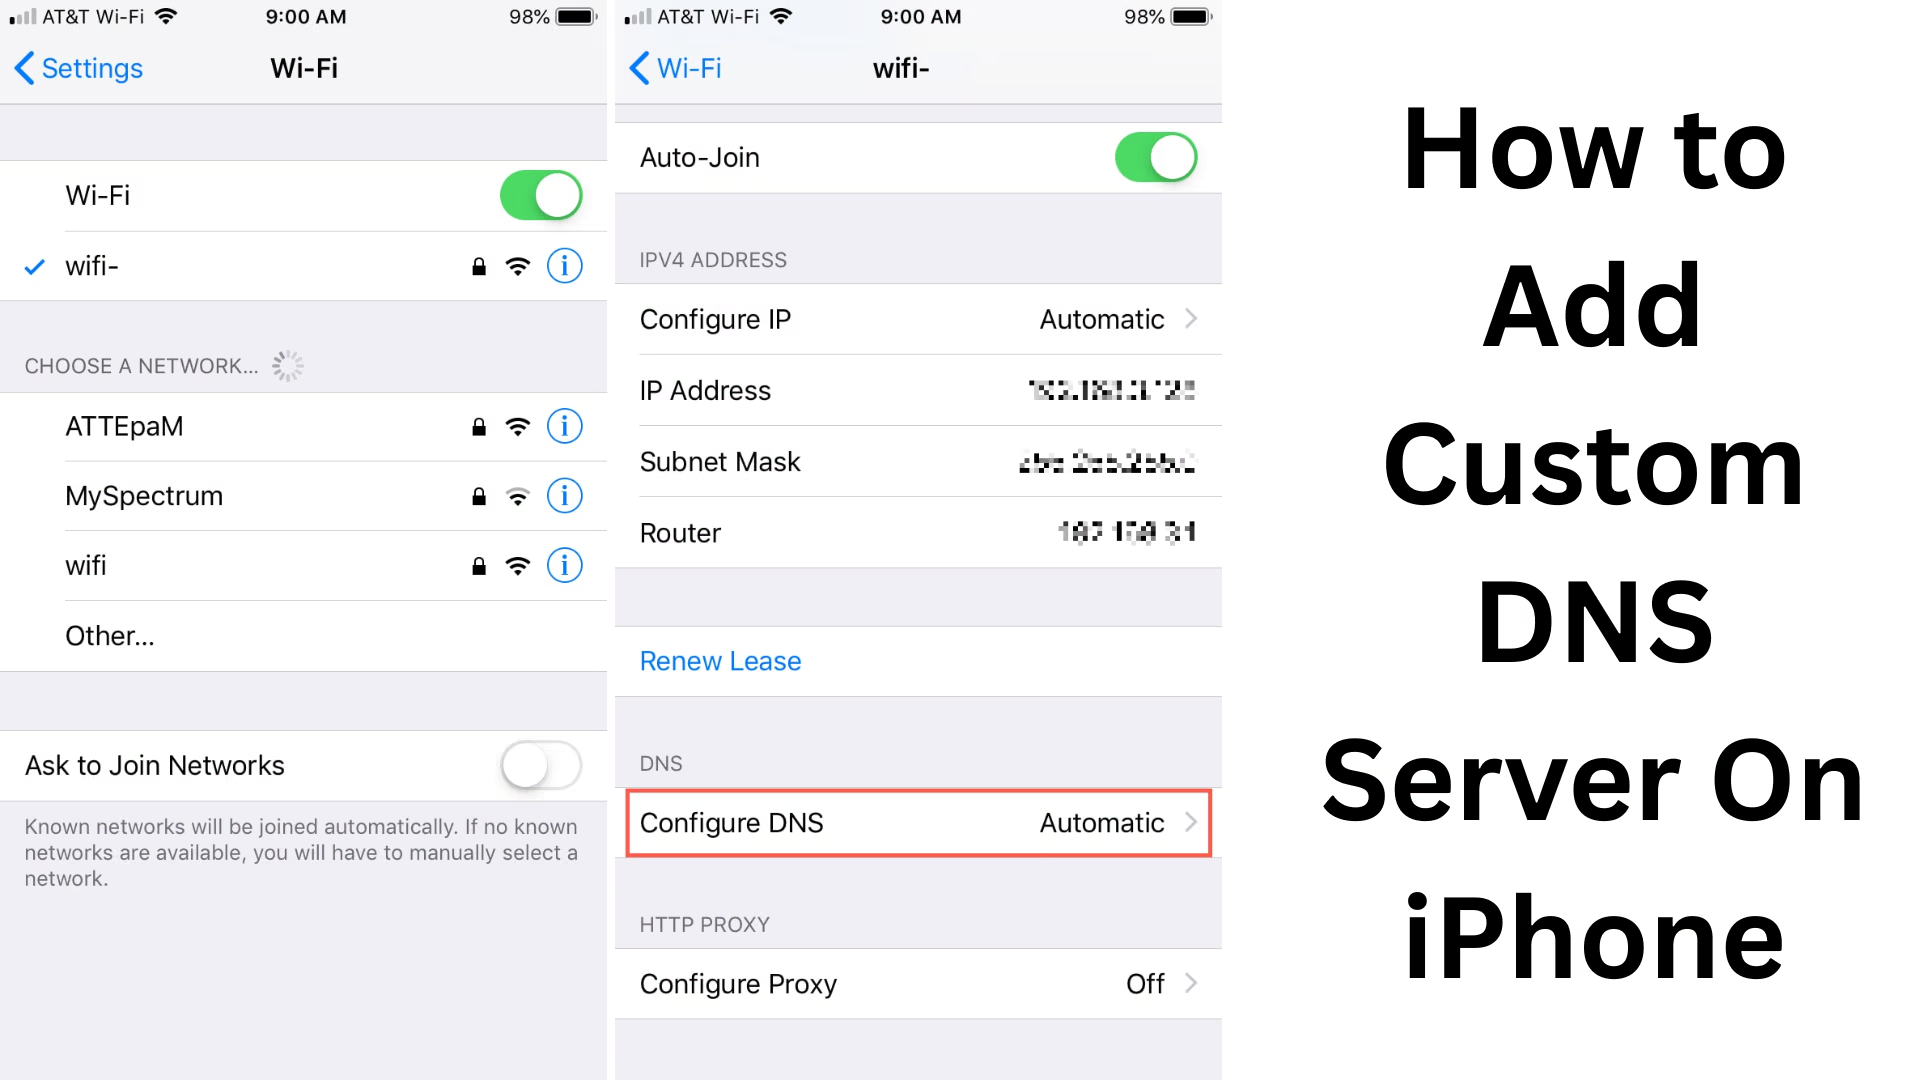
Step 1: Open iPhone Settings
Open the Settings app on your iPhone.
Step 2: Go to the Wi-Fi section
Tap Wi-Fi and select the network you are currently connected to.
Step 3: Tap on the ‘i’ icon
Tap on the (i) icon next to the Wi-Fi network you are connected to.
Step 4: Edit DNS section
Scroll down and find the Configure DNS option.
Tap on it and select the Manual option.
Now, delete the existing DNS address.
Then tap on Add Server and enter the DNS address of your choice.
For example:
Google DNS: `8.8.8.8` and `8.8.4.4`
Cloudflare DNS: `1.1.1.1` and `1.0.0.1`
OpenDNS: `208.67.222.222` and `208.67.220.220`
Step 5: Save
After adding the DNS addresses, tap Save in the top right.
Your custom DNS is now activated for that network on the iPhone.
Use Apps to Set System-Level DNS
If you want all iPhone traffic to go through a particular DNS server, you’ll need to use a DNS changing app.
Set up DNS with Cloudflare 1.1.1.1 App
Cloudflare’s 1.1.1.1 App provides an easy and fast way to change DNS on iPhone for the entire system.
Step 1: Download the App
Install the 1.1.1.1: Faster & Safer Internet app from the App Store.
Step 2: Open the App and Allow
Open the app and accept the required permissions.
You will get an option to enable the VPN profile — Allow it.
Step 3: Turn on DNS service
Turn on the toggle button in the app.
Now, all traffic on your iPhone will be routed through Cloudflare DNS (1.1.1.1).
This method works for both Wi-Fi and mobile data.
Notes when setting up custom DNS
VPN and DNS profiles can conflict, so if you’re using a VPN, DNS settings may not work properly.
Changing Wi-Fi networks will require resetting DNS settings unless you use system-level DNS.
Some DNS servers also offer content filtering features for children, which can be useful for parental controls.
Recommended DNS Server List (for Performance + Privacy)
| DNS Server | Primary IP | Secondary IP | Features |
|—————-|—————-|—————-|—————————|
| Google DNS | 8.8.8.8 | 8.8.4.4 | Fast and reliable |
| Cloudflare DNS | 1.1.1.1 | 1.0.0.1 | Fast, privacy-focused |
| OpenDNS | 208.67.222.222 | 208.67.220.220 | Security + Filtering |
| Quad9 | 9.9.9.9 | 149.112.112.112| Secure & Private |
How to Check DNS Settings on iPhone
1. Settings > Wi-Fi > Tap on the ‘i’ icon of the network.
2. In the DNS section below, you can see which DNS is in use.
How Changing DNS Servers Can Benefit You
Faster Browsing Speed
Protection from Phishing and Malware
Content Filtering (Parental Control)
Better Privacy and Data Encryption
Conclusion
Now that you learned how to set a Custom DNS Server on iPhone, you can make your Internet Speed, Security, and Browsing Experience better than ever. Whether you change DNS on a Wi-Fi network or use the Cloudflare app, you will see the difference.
Want to grow your business organically? Contact us now
Frequently Asked Questions (FAQ) – How to add Custom DNS Server to iPhone
Q. 1: Is it safe to change DNS server on iPhone?
Answer: Yes, of course. Using a trusted DNS server (such as Google DNS, Cloudflare, or OpenDNS) can make your browsing experience even safer and faster.
Q. 2: Does changing DNS increase internet speed?
Answer: Yes, sometimes changing the DNS server reduces DNS resolution time, which makes websites load faster. However, it also depends on the ISP and network conditions.
Q. 3: How to change the DNS on mobile data in iPhone?
Answer: DNS settings for mobile data in iPhones cannot be done directly. To do this, you need to use an app like Cloudflare 1.1.1.1, which changes DNS through a VPN profile.
Q. 4: What websites can be blocked by changing DNS servers?
Answer: If you use a DNS server that provides content filtering (such as OpenDNS), some websites may be automatically blocked, such as porn or phishing websites.
Q. 5: Do I need to set the DNS separately for each Wi-Fi network?
Answer: Yes, on an iPhone, if you change DNS via a Wi-Fi network, it only applies to that network. You need to set it separately for each network.
Q. 6: Do VPN and DNS work together?
Answer: In some cases, VPN overrides DNS settings. If you are setting DNS manually and also using a VPN, DNS may not have any effect.
Q. 7: Which DNS server is best?
Answer It depends on your purpose:
For speed, use Google DNS (8.8.8.8)
For privacy – Cloudflare DNS (`1.1.1.1`)
For content filtering, use OpenDNS (`208.67.222.222`)
Q. 8: How to remove DNS settings?
Answer
Settings > Wi-Fi > Tap the ‘i’ of the network > Configure DNS > Select Automatic. This will remove the custom DNS, and the iPhone will use the ISP’s default DNS.